Introduction: Add a Touch of Handcrafted Elegance to Your Dining Experience
In the realm of home décor and table settings, the details often speak volumes. While the food and company are paramount, the small touches that adorn your table can transform a simple meal into a memorable occasion. A beautifully crafted napkin holder, especially one with the unique character of hammered metal, can add a touch of artisanal charm and personal flair. This comprehensive DIY guide will walk you through the process of creating your own stunning hammered napkin holder set, perfect for personal use or as a heartfelt, handmade gift. Forget mass-produced plastic or generic designs; we’re going to unlock the satisfaction of creating something truly special with your own hands.
Must-Have Tools in Your House If You Work Regularly


Why Choose a DIY Hammered Napkin Holder Set?
There are several compelling reasons to embark on this creative journey:
- Uniqueness: Each hammered mark tells a story, making your napkin holder unlike any other.
- Cost-Effectiveness: Often, creating your own décor items is more budget-friendly than purchasing high-quality, artisanal pieces.
- Personalization: You can customize the size, shape, and even the type of metal to perfectly match your existing décor or the recipient’s taste.
- Skill Development: This project is a fantastic way to learn basic metalworking techniques and gain confidence in your crafting abilities.
- Gift-Giving Potential: A handmade gift carries immense sentimental value and is often cherished more than a store-bought item.
- Durability: With proper technique, your hammered napkin holder will be a lasting addition to your table.
Materials and Tools: Gathering Your Arsenal
Before we begin hammering, it’s essential to gather the necessary materials and tools. Safety should always be your top priority, so remember to wear appropriate protective gear.
Essential Materials
- Sheet Metal: The foundation of your napkin holder. Common choices include:
- Brass: Offers a warm, golden hue and is relatively easy to work with.
- Copper: Provides a rich, reddish-brown tone that can be polished to a high shine or left to develop a patina.
- Aluminum: Lightweight, corrosion-resistant, and budget-friendly, though it can dent more easily.
- Steel (e.g., galvanized or stainless): More durable and can be painted or left with a rustic finish.
For this project, we’ll focus on a gauge of metal that is sturdy enough to hold napkins but pliable enough to hammer. Aim for around 20-24 gauge sheet metal. You can often purchase this in craft stores or online metal suppliers.
- Sturdy Work Surface: A solid workbench or a very robust table that can withstand hammering.
- Protective Eyewear: Essential to shield your eyes from flying metal shards.
- Work Gloves: To protect your hands from sharp edges and potential abrasions.
- Masking Tape or Painter’s Tape: For marking lines and protecting surfaces if needed.
- Metal File: For smoothing any sharp edges after cutting.
- Sandpaper: Various grits (e.g., 100, 220, 400) for smoothing and polishing.
- Metal Polish (optional): To achieve a high shine on brass, copper, or steel.
- Damp Cloths: For cleaning.
Essential Tools
- Metal Shears or Tin Snips: For accurately cutting the sheet metal.
- Ball-Peen Hammer: This hammer has a rounded end (the “peen”) which is crucial for creating the hammered texture without sharp indentations. A standard ball-peen hammer with a 1-2 lb head is suitable.
- Bench Block or Anvil: A solid, flat surface made of steel or hardened aluminum. This provides a firm backing for hammering, allowing the metal to displace rather than simply indent.
- Paper Template: To plan your design before cutting metal.
- Marker or Scribe: For transferring your template design onto the metal.
- Ruler or Measuring Tape: For precise measurements.
- Pliers (e.g., Needle-Nose Pliers, Flat-Nose Pliers): For bending and shaping the metal.
- Clamps (optional but recommended): To secure your work to the bench block.
Key Facts and Design Considerations
Let’s lay out some important facts and considerations before we dive into the actual crafting process.
| Factor | Details |
|---|---|
| Metal Gauge | 20-24 gauge is recommended for a balance of workability and sturdiness. Thinner gauges are easier to hammer but can bend too easily; thicker gauges are more durable but harder to shape. |
| Hammer Type | Ball-peen hammer is essential for creating the characteristic hammered texture without creating sharp divots. |
| Work Surface | A steel bench block or small anvil is crucial. Hammering directly on a wooden surface will result in dents in the wood and less effective hammering on the metal. |
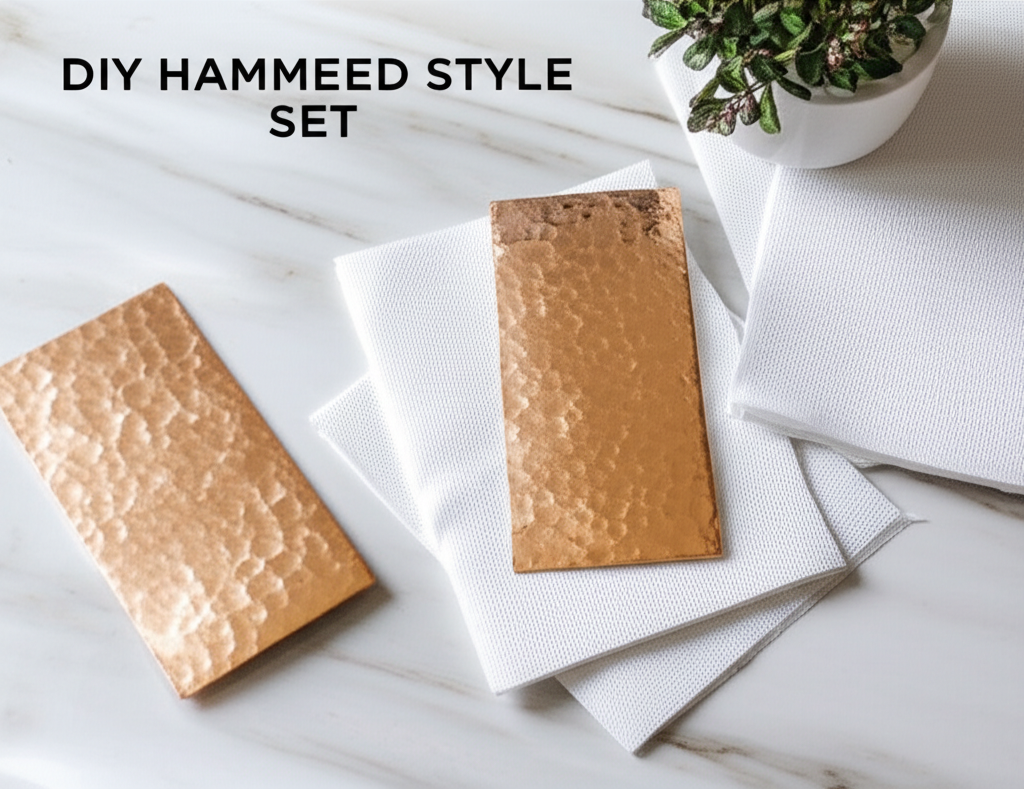
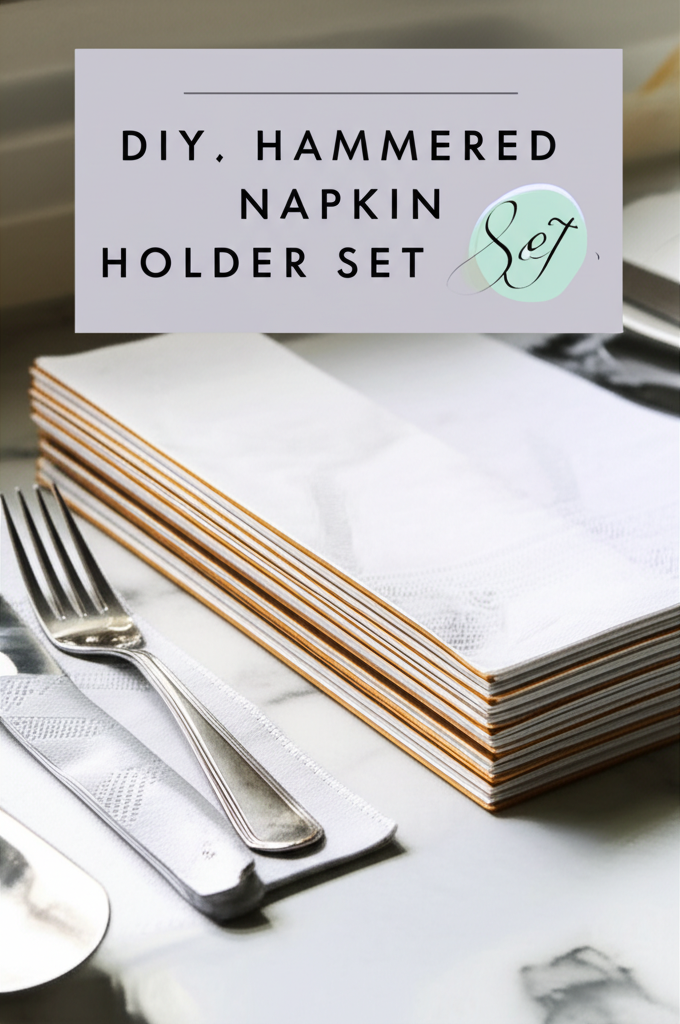
| Napkin Holder Design | Consider the dimensions required for your napkins. Standard cloth napkins are typically around 18-20 inches square, folded. A holder around 4-5 inches in length and 1.5-2 inches wide is usually sufficient. You’ll also need a base and a sturdy upright or frame to hold the napkins in place. |
| Hammering Technique | Consistent, overlapping strikes with the ball peen are key to creating an even, textured finish. The angle of your hammer strike can influence the depth and appearance of the hammer marks. |
| Finishing Touches | Smoothing edges with a file and sandpaper is vital for safety and aesthetics. Polishing can enhance the metal’s natural beauty. |
Step-by-Step Crafting Process
Now, let’s get down to business and craft your hammered napkin holder set. We’ll outline a basic rectangular design that is relatively straightforward to achieve.
Step 1: Design and Template Creation
- Measure Your Napkins: Determine the ideal dimensions for your napkin holder based on the size and thickness of the napkins you intend to use.
- Sketch Your Design: Draw a simple, clean design. For a basic holder, you’ll need:
- A rectangular base.
- Two side pieces or a U-shaped piece to cradle the napkins.
- Consider adding a decorative element or a slight lip to prevent napkins from sliding out.
- Create Paper Templates: Carefully draw your design components onto sturdy paper or cardstock. Ensure precise measurements. Cut out these paper templates.
Step 2: Transferring the Design to Metal
- Position Templates: Lay your paper templates onto the sheet metal.
- Secure and Trace: If using masking tape, secure the templates firmly to the metal. Use a marker or a metal scribe to carefully trace the outlines of your templates onto the metal. A scribe will create a more precise line that won’t smudge.
Step 3: Cutting the Metal Pieces
- Safety First: Put on your safety glasses and gloves.
- Use Metal Shears: Carefully cut along the traced lines using your metal shears or tin snips. Work slowly and steadily, guiding the shears to make clean cuts.
- Cut Multiple Pieces: Cut out all the necessary components for your napkin holder set. If you’re making a set of two, you’ll need to repeat this process for each holder.
Step 4: Smoothing the Edges
- File Sharp Edges: Use a metal file to carefully smooth down any sharp or rough edges created by the cutting process. This is crucial for safety.
- Sand for Smoothness: Follow up with sandpaper, starting with a coarser grit (e.g., 100 or 220) to remove any filing marks, and then moving to finer grits (e.g., 400) for a smoother finish.
Step 5: Hammering the Texture
This is where the magic happens!
- Secure the Metal: Place one of your metal pieces flat onto your bench block or anvil. If needed, use clamps to hold it securely, ensuring the clamps do not interfere with your hammering area.
- Start Hammering: Take your ball-peen hammer and begin striking the surface of the metal. The goal is to create an even, textured pattern.
- Peen Side Down: Ensure the rounded peen of the hammer is making contact with the metal.
- Consistent Strikes: Aim for consistent, overlapping strikes. Don’t hit too hard initially; you can gradually increase pressure as you become more comfortable.
- Work in Sections: Hammer one area at a time, gradually working across the entire surface of each piece.
- Rotate and Re-strike: Rotate the metal piece and continue hammering from different angles to achieve a uniform texture.
- Hammering for Shaping (Optional but Recommended): As you hammer, the metal will naturally start to move and slightly curve. You can use the peen of the hammer to gently shape the edges and create the desired form of your napkin holder. For example, to create a bend for the sides of the holder, you would hammer along the intended bend line, gradually persuading the metal to conform.
- Repeat for All Pieces: Repeat the hammering process for all the components of your napkin holder set.
Step 6: Bending and Shaping the Holder
Now it’s time to assemble your hammered pieces.
- Base and Sides: Take your base piece. If you’ve cut separate side pieces, you’ll need to bend them to create the upright walls of the holder. You can do this by gently pressing the metal against the edge of your bench block or by using pliers for more controlled bending.
- Creating the U-Shape: For a simple U-shaped holder, you’ll likely bend a single piece of metal to form the base and two sides. Hammering along the intended bend lines can help achieve cleaner folds.
- Securing Components (If separate): If you have separate base and side pieces, you might need a way to join them. For a truly seamless look, consider using metal adhesive or small rivets (though this adds complexity). For a simpler approach, you might design the pieces to interlock or create tabs for folding. Alternatively, for a sturdy, one-piece design, you can cut and bend a single strip of metal.
Step 7: Final Assembly and Finishing Touches
- Check Fit: Ensure all the pieces fit together snugly.
- Smooth Again: Gently re-smooth any edges that may have become sharp during the bending and shaping process.
- Clean the Metal: Wipe down the entire napkin holder with a damp cloth to remove any metal dust or debris.
- Polish (Optional): If you want a brilliant shine, use a metal polish suitable for your chosen metal. Apply the polish with a soft cloth, rub in a consistent direction, and buff to a high shine.
- Let it Shine: Your beautifully hammered napkin holder set is now complete!
Troubleshooting and Tips
Even with careful planning, you might encounter a few snags. Here are some common issues and solutions:
- Uneven Hammer Marks: This is common when starting. Keep practicing! You can sometimes re-hammer over uneven areas to blend them, but be mindful of thinning the metal too much.
- Metal Thinning Too Much: Hammering displaces metal, causing it to thin. If you notice an area becoming excessively thin, ease up on the hammering there.
- Sharp Edges Persist: Don’t skip the filing and sanding stages. Patience with these finishing steps is key to a safe and polished product.
- Difficulty Bending: Thicker gauge metal will be harder to bend. Gentle, repeated hammer strikes along the bend line can help. You can also try heating copper or brass slightly (with caution and proper ventilation) to make it more malleable, but this is an advanced technique.
- Getting a Set of Matching Holders: If you are making a set, try to use the same amount of hammering and shaping on each piece for a cohesive look.
Pros and Cons of DIY Hammered Napkin Holders
Let’s weigh the advantages and disadvantages of undertaking this project.
| Pros | Cons |
|---|---|
| Unique Aesthetic: Creates a distinctive, artisanal look. | Time-Consuming: Hammering and finishing can take significant time and patience. |
| Cost-Effective: Generally cheaper than buying high-end metalware. | Requires Specific Tools: You’ll need metal shears, a ball-peen hammer, and a bench block. |
| Highly Customizable: Adaptable to any style or size. | Potential for Sharp Edges: Requires careful finishing for safety. |
| Great Gift Idea: A thoughtful and impressive handmade present. | Learning Curve: Hammering technique requires practice to master. |
| Satisfying Accomplishment: The pride of creating something beautiful yourself. | Metal Choice Matters: Some metals are harder to work with than others. |
Beyond the Basic: Variations and Embellishments
Once you’ve mastered the basic hammered napkin holder, consider these creative variations:
- Different Shapes: Experiment with round, oval, or even more abstract shapes.
- Mixed Metals: Combine brass and copper for a unique two-tone effect.
- Riveted Construction: For a more industrial look, consider using small metal rivets to join pieces.
- Stamping: Before hammering, you can use metal letter or number stamps to personalize the pieces with initials or dates.
- Patina: For copper or brass, you can intentionally create a patina for an antique or aged look using specialized chemicals or natural methods (research safety precautions thoroughly).
- Wire Accents: Wrap decorative wire around the holder for added detail.
Conclusion: A Testament to Your Craftsmanship
Creating a DIY hammered napkin holder set is more than just a crafting project; it’s an opportunity to infuse your home with unique personality and a touch of your own artistic spirit. From the initial design concept to the final polish, each step is a journey that culminates in a functional piece of art. The tactile satisfaction of the hammered texture, combined with the inherent beauty of the metal, will elevate your table settings and serve as a constant reminder of your own creative prowess. So, gather your tools, embrace the process, and enjoy crafting a set of hammered napkin holders that will be admired for years to come.