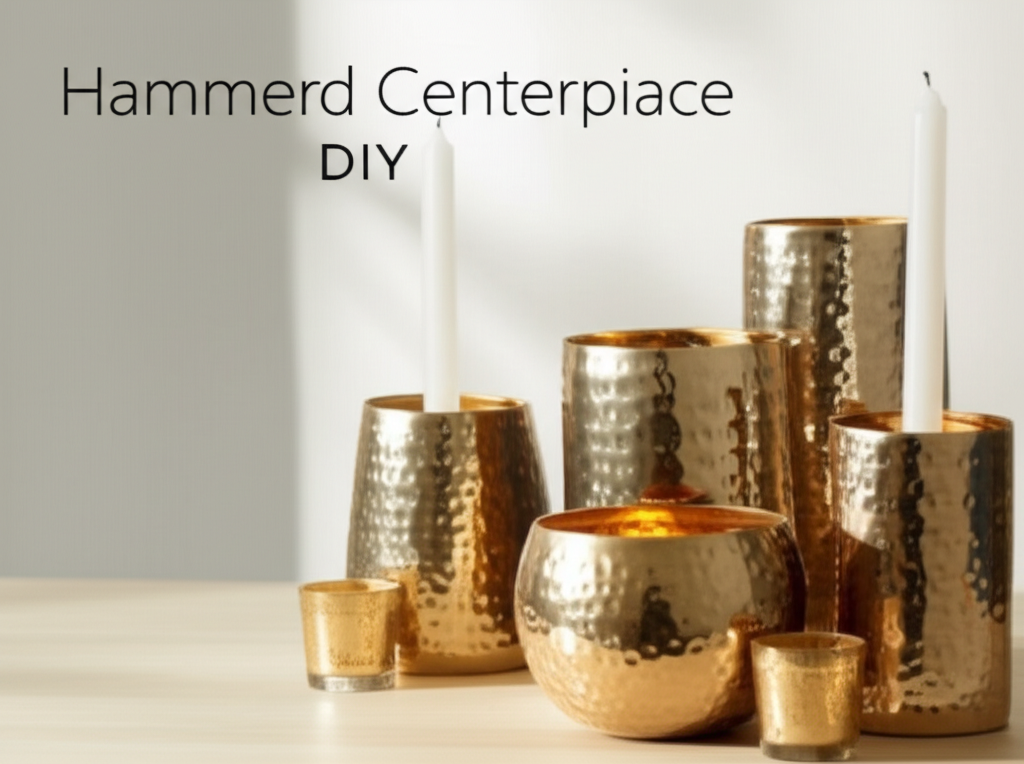
Introduction: Elevate Your Table with a DIY Hammered Centerpiece
Tired of the same old decorative accents? Looking to infuse your dining space with a touch of rustic elegance and personal craftsmanship? Creating your own hammered metal centerpiece set is a rewarding and surprisingly accessible DIY project. This guide will walk you through everything you need to know to transform simple metal blanks into stunning, artisan-quality decor that will be a conversation starter at any gathering. We’ll cover the essential materials, the step-by-step process, and tips for achieving that coveted hammered look. Get ready to unleash your inner artisan and create a centerpiece that truly reflects your style.
Must-Have Tools in Your House If You Work Regularly


Why Choose a Hammered Metal Centerpiece?
The appeal of hammered metal lies in its unique aesthetic and inherent character. Unlike mass-produced decor, each piece you create will possess its own subtle variations and imperfections, adding to its charm and uniqueness. The hammered texture creates a beautiful play of light and shadow, adding depth and visual interest to your table. Furthermore, it’s a versatile style that complements a wide range of interior design aesthetics, from farmhouse and rustic to industrial and even modern.
The Benefits of a DIY Approach:
- Cost-Effective: Creating your own centerpiece set can be significantly cheaper than purchasing comparable items from boutique stores or high-end retailers.
- Customization: You have complete control over the size, shape, finish, and even the number of pieces in your set. Want a specific color? You can achieve that. Need a particular height? No problem.
- Sense of Accomplishment: There’s immense satisfaction in knowing you’ve created something beautiful and functional with your own hands.
- Unique Gift Potential: A handmade hammered metal centerpiece set makes for an incredibly thoughtful and personalized gift.
Essential Materials for Your Hammered Centerpiece Set
To embark on this creative journey, you’ll need a few key supplies. Don’t be intimidated; most of these are readily available at craft stores, hardware stores, or online.
Metal Blanks: The Foundation of Your Design
The starting point for your hammered centerpiece set will be metal blanks. These are pre-cut pieces of metal that you will shape and texture.
- Types of Metal:
Aluminum: Lightweight, easy to work with, and resistant to tarnishing. It’s an excellent choice for beginners.
Copper: Offers a warm, rich tone that can develop a beautiful patina over time. It’s a bit harder to work than aluminum but offers a luxurious feel.
Brass: Similar to copper in its warm hue, brass is durable and can also develop a lovely patina.
Steel: While durable, steel can be heavier and more challenging to hammer without specialized tools. It’s often used for more robust or industrial-style pieces.
- Common Shapes and Sizes:
Discs: Perfect for creating shallow bowls, trays, or coasters. Available in various diameters.
Rectangles/Squares: Ideal for constructing geometric trays, candle holders, or platters.
Wire: Can be used for handles, decorative elements, or to create wire-wrapped candle holders.
Sheet Metal: For more ambitious projects, you can purchase larger sheets and cut them to your desired shapes.
Tools for Hammering and Shaping
The right tools are crucial for achieving the desired hammered effect and shaping your metal.
- Hammers:
Chasing Hammer: This hammer has a slightly domed or rounded face, ideal for creating the patterned hammering effect without overly deforming the metal.
Ball-Peen Hammer: Features a rounded end (peen) which is excellent for spreading metal and creating a more pronounced hammered texture. You might use this for initial shaping.
Rawhide or Nylon Mallet: Useful for gentle shaping and forming without marring the surface of softer metals like aluminum.
- Anvil or Bench Block: A solid, flat surface is essential for hammering.
Steel Bench Block: A common and effective choice.
Small Anvil: If you plan on doing a lot of metalwork, a small anvil provides a very stable hammering surface.
Heavy-duty hardwood block: Can be used in a pinch if it’s very dense and stable.
- Dolly (Shaping Tools): These are small metal forms with various curves and shapes that you place the metal over and hammer against. They help create concave or convex forms.
- Forming Mandrels: Tapered metal rods used to shape metal into cylindrical or conical forms, like vase-like shapes.
- Metal Shears or Tin Snips: For cutting metal blanks if you’re not using pre-cut shapes.
- Sandpaper and Polishing Cloths: For smoothing edges and bringing out the shine.
- Safety Gear:
Safety Glasses: Absolutely essential to protect your eyes from flying metal fragments.
Gloves: To protect your hands from sharp edges and potential abrasions.
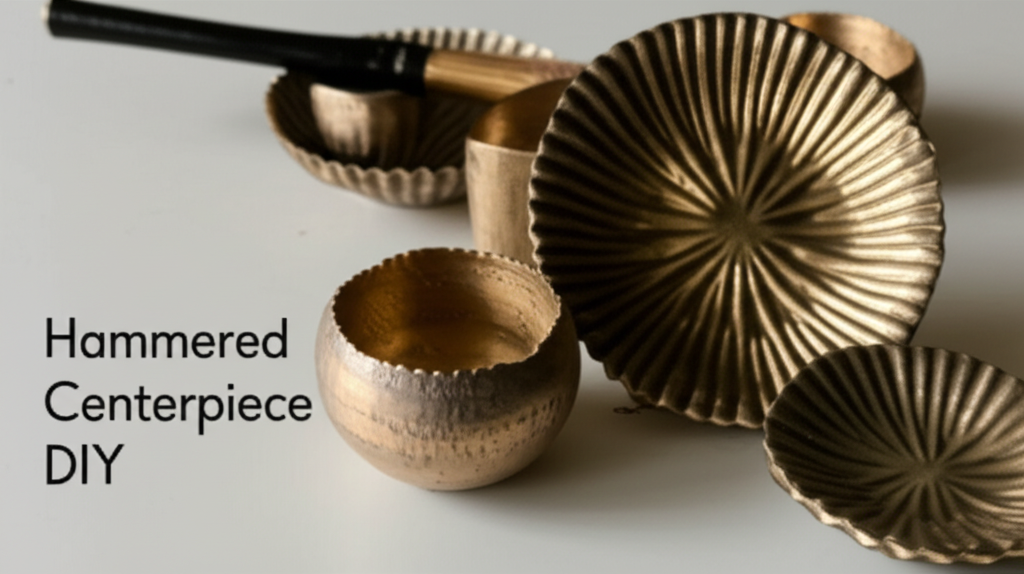
Optional Finishing and Decorative Elements
Once your centerpiece is hammered and shaped, you might want to add some finishing touches.
- Metal Polish: To restore shine and remove any oxidation.
- Patina Solution: For copper and brass, a patina solution can accelerate the aging process, creating beautiful verdigris or antique finishes.
- Clear Coat Sealant: To protect the finish and prevent further tarnishing, especially for copper and brass.
- E6000 or Strong Adhesive: If you plan to add decorative elements like beads, stones, or attach separate pieces.
- Small Bowls or Votives: To hold flowers, candles, or other decorative items within your centerpiece.
Key Facts and Comparison of Metal Blanks
Here’s a quick comparison to help you choose the best metal blanks for your DIY hammered centerpiece set.
| Metal Type | Ease of Hammering | Durability | Tarnish Resistance | Aesthetic Appeal | Best For |
|---|---|---|---|---|---|
| Aluminum | Very Easy | Moderate | Excellent | Bright, silvery | Beginners, lightweight pieces, modern/industrial looks |
| Copper | Moderate | Good | Low (develops patina) | Warm, reddish-brown, develops rich patina | Classic, rustic, farmhouse styles; pieces intended to age |
| Brass | Moderate | Very Good | Low (develops patina) | Warm, golden hue, develops antique patina | Elegant, traditional, vintage styles; pieces requiring a golden tone |
| Steel | Difficult without specialized tools | Excellent | Moderate (can rust if not sealed) | Silvery-grey, industrial | Heavy-duty pieces, industrial aesthetics (requires more advanced techniques) |
Step-by-Step Guide to Creating Your Hammered Centerpiece Set
Now that you have your materials, let’s get down to the creative process. Remember to work in a well-ventilated area and always prioritize safety.
Step 1: Design Your Centerpiece Concept
Before you start hammering, visualize what you want to create. Will it be a simple tray? A multi-level tiered centerpiece? A set of candle holders? Sketching out your ideas can be very helpful. Consider the scale and proportion of your dining table.
Step 2: Prepare Your Workspace and Safety Gear
Set up your hammering station. Ensure your bench block or anvil is stable on a sturdy surface. Put on your safety glasses and gloves.
Step 3: Cut or Prepare Your Metal Blanks (If Necessary)
If you’re using sheet metal, use your metal shears to cut out your desired shapes. If you’re using pre-cut blanks, you might want to lightly sand any sharp edges.
Step 4: Begin Hammering – Shaping and Texturing
This is where the magic happens!
- Shaping: Place your metal blank over your bench block or dolly. Use your chosen hammer (rawhide or ball-peen for initial shaping) to gently tap the metal. Work in a circular motion, gradually pushing the metal outwards and downwards to create curves or bowls. For a more pronounced shape, use a dolly with the desired contour underneath the metal.
- Texturing: Once you have the basic shape, switch to your chasing hammer or the rounded end of a ball-peen hammer. Hold the hammer at a slight angle to the metal. Strike the metal with a rhythmic, overlapping pattern. Each strike will create a small indentation.
For a fine, consistent texture: Use the flat face of the chasing hammer and strike with moderate force.
For a bolder, more rustic texture: Use the ball-peen hammer or the domed face of the chasing hammer, striking with more force and spacing out your blows.
* Vary your hammer angle: Experiment with holding the hammer at different angles to create diverse hammered effects.
- Working with Wire: For wire elements, you can use round-nose pliers to create loops or twists, and then gently hammer these areas to integrate them with the main piece.
Step 5: Refine the Shape and Texture
Continue hammering, rotating the metal and working from the center outwards, or vice-versa, depending on your desired effect. Take breaks to assess your progress. You can use sandpaper to smooth out any particularly rough spots between hammering sessions.
Step 6: Incorporate Multiple Pieces (If Creating a Set)
If you’re making a multi-piece set, you might want to create different sizes or shapes of hammered elements. You can then arrange these on a larger base, or attach them using strong metal adhesive. For example, you could hammer several small dishes and arrange them on a flat hammered tray.
Step 7: Finishing Touches
Once you are happy with the hammered texture and shape:
- Clean: Wipe down the metal to remove any dust or debris.
- Polish (Optional): If you want a bright, shiny finish, use a metal polish and a soft cloth to buff the surface.
- Apply Patina (Optional): For copper or brass, you can apply a patina solution according to the manufacturer’s instructions to achieve an aged look.
- Seal (Optional): To preserve the finish, especially if you used a patina, apply a clear metal sealant. This will prevent further oxidation and keep your centerpiece looking its best.
Step 8: Final Assembly and Styling
If your design involves multiple components, ensure they are securely attached. Once complete, style your hammered centerpiece on your dining table. Add candles, fresh flowers, decorative spheres, or seasonal items to complete the look.
Tips for Achieving a Professional Hammered Finish
Even with basic tools, you can achieve impressive results with a few insider tips.
- Practice Makes Perfect: Don’t expect perfection on your first try. Dedicate some time to practicing on scrap metal to get a feel for the hammering process and how different hammers affect the metal.
- Consistent Strikes: Aim for consistent pressure and spacing of your hammer blows for a more uniform texture.
- Work Methodically: Hammer in a systematic pattern, working your way around the piece to avoid creating uneven areas.
- Listen to the Metal: As you hammer, you’ll begin to hear how the metal responds. This can help you gauge the right amount of force to use.
- Don’t Overwork It: It’s easy to get carried away, but over-hammering can lead to thinning the metal too much or distorting the shape beyond repair.
- Clean Between Steps: Periodically cleaning your metal can help you see the texture and shape more clearly.
Project Variations and Creative Ideas
The possibilities are endless when it comes to designing your hammered centerpiece set. Here are a few ideas to spark your imagination:
- Tiered Tray: Create several hammered discs of increasing diameter. Attach them to a central rod or post to create a beautiful tiered stand.
- Candle Holders: Hammer metal cups or cylinders to hold pillar candles or votives. You can also create hammered bases for existing glass candle holders.
- Serving Trays: Hammer flat metal sheets into shallow trays with slightly raised edges, perfect for serving appetizers or displaying decorative items.
- Floral Vessels: Hammer metal into a vase-like shape to hold fresh or dried floral arrangements.
- Coasters and Trivets: Smaller hammered metal discs can be transformed into stylish coasters or trivets to protect your table surfaces.
- Mixed Media:** Incorporate other materials like wood, ceramic, or glass by attaching them to your hammered metal bases or elements.
Troubleshooting Common DIY Hammering Issues
Even with careful planning, you might encounter a few bumps along the way.
| Problem | Cause | Solution |
|---|---|---|
| Metal tearing or cracking | Hammering too forcefully, especially on edges; working the metal too much in one area; using brittle metal. | Use lighter, more frequent strikes. Hammer in a circular motion, working outwards. Ensure you are using malleable metal. If tearing occurs, try to gently reshape the area or incorporate it as a deliberate distressed element. |
| Uneven hammering pattern | Inconsistent hammer strikes; not rotating the metal frequently enough. | Focus on a rhythmic, consistent strike pattern. Rotate the metal frequently to ensure even texture coverage. Practice on scrap pieces. |
| Metal becoming too thin or distorting | Over-hammering in specific areas; using too much force. | Use less force and more frequent, overlapping strikes. Take breaks to assess the thickness. Consider using a dolly to support the metal and distribute the force. |
| Sharp edges after cutting | Metal edges are naturally sharp after cutting. | Use sandpaper or a file to carefully smooth and deburr all cut edges. Always wear gloves when handling freshly cut metal. |
| Difficulty achieving desired shape | Not using appropriate shaping tools (dollies, mandrels); not applying enough gradual force. | Experiment with different dollies and shaping mandrels. Use a mallet or hammer with less force initially, gradually increasing pressure to coax the metal into shape. |
Conclusion: Enjoy Your Handcrafted Masterpiece
Creating your own hammered table centerpiece set is a journey of patience, creativity, and a little bit of elbow grease. The satisfaction of transforming raw materials into a beautiful, functional piece of art for your home is unparalleled. With this guide, you’re well-equipped to start your project and add a unique, handmade touch to your dining experience. So gather your supplies, embrace the process, and enjoy the rustic charm you’ll bring to your table. Happy hammering!