Unleashing Your Inner Artist: The Unexpected Charm of Hammered Wall Art
Tired of the same old posters and mass-produced prints? Do you crave a touch of unique, handmade character in your home décor? If so, it’s time to consider a tool you might already have in your garage or toolbox: the humble hammer. Far from its destructive capabilities, a hammer can be your paintbrush, your chisel, and your sculptor’s tool for creating stunning DIY wall art. This guide will walk you through the exciting world of hammered art, from understanding the basic techniques to showcasing your finished masterpieces.
Must-Have Tools in Your House If You Work Regularly


Why Choose Hammered Wall Art?
The appeal of hammered wall art lies in its raw, tactile beauty. Unlike delicate brushstrokes or crisp printed lines, hammered art possesses a tangible texture, a testament to the human touch involved in its creation. It’s about embracing imperfection and finding beauty in the marks left behind. Here are some key advantages:
- Unique and Personalized: Each piece is one-of-a-kind, reflecting your individual style and creativity.
- Cost-Effective: You can often use recycled materials and common household items, keeping costs low.
- Therapeutic and Rewarding: The rhythmic act of hammering can be surprisingly calming and incredibly satisfying as you see your vision take shape.
- Durable and Long-Lasting: Metal art, in particular, can withstand the test of time and add a lasting element to your décor.
- Conversation Starter: Your guests are sure to be intrigued by the story behind your handmade art.
Key Hammering Techniques for Wall Art
Before you grab your hammer and start striking, it’s crucial to understand some fundamental techniques that will allow you to control the outcome and achieve specific visual effects.
1. Hammering on Metal: Creating Texture and Dimension
Metal is a fantastic medium for hammered art, offering a satisfying resistance and a beautiful way to manipulate light and shadow.
a) Dishing/Doming:
This technique involves using a rounded hammer (like a ball-peen hammer) or a specialized chasing hammer against a metal surface placed over a dome-shaped anvil or a sturdy, curved support. By striking the metal, you create convex, rounded shapes, adding depth and an organic feel to your piece. The density of the doming can be controlled by the force and frequency of your hammer blows.
b) Planishing:
Planishing is used to smooth out hammered textures and create a more refined, even surface. It’s typically done with a flatter hammer face over a smooth, flat surface. This technique is essential for achieving a polished look after initial texturing or for creating smooth, reflective areas.
c) Repoussé:
Repoussé is a more advanced technique that involves hammering a design from the reverse side of the metal. This pushes the metal outwards, creating raised relief patterns on the front. It requires precision and often involves transferring a design onto the metal first. While more complex, the results can be breathtakingly sculptural.
d) Simple Texturing:
Even without specialized hammers, you can create interesting textures by using different parts of a standard claw hammer. For instance, the flat face of the hammer can create broad indentations, while the side or even the claw (used carefully) can create linear or point-like textures. Experimenting with different angles and pressure is key.
2. Hammering on Wood: Adding Rustic Charm
Wood offers a different kind of canvas, embracing hammer marks with a rustic, earthy aesthetic.
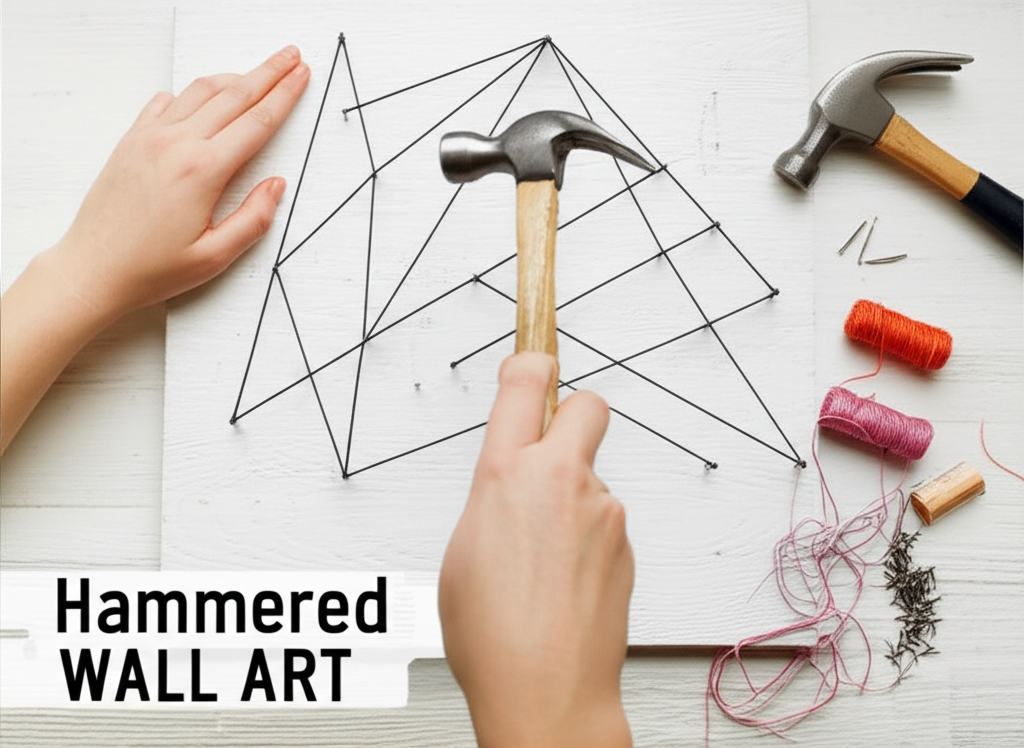
a) Nail Art/String Art Base:
This is one of the most accessible forms of hammered art. You’ll use small nails or brads hammered into a wooden surface to create a pattern. Then, colorful string, yarn, or even thin wire is wrapped around the nails to form intricate designs. The spacing and depth of the nails directly influence the final look.
b) Wood Burning with a Hammer (Indirect Method):
While not direct wood burning, you can create a similar effect by heating the head of a metal hammer (carefully, using pliers) and then pressing it onto the wood. This creates scorched marks. Different temperatures and contact times will yield varying shades of brown and black. Safety is paramount here; ensure good ventilation and handle hot objects with extreme caution.
c) Creating Indentations and Grooves:
Use the claw of your hammer or even a specialized hammering tool to create intentional dents, gouges, or grooves in a wooden surface. These can add tactile interest and a weathered appearance to your art.
3. Hammering on Other Materials: Expanding Your Horizons
Don’t limit yourself! With careful consideration, you can experiment with other materials.
a) Plaster or Drywall:
For a unique textural piece, you can hammer into a wet plaster surface or even a slightly softened drywall panel. This creates soft, organic impressions that can be left as is or painted once dry.
b) Found Objects:
Repurpose old metal objects like keys, gears, or cutlery. You can hammer them into new arrangements, flatten them, or create patterns on their surfaces.
Essential Tools and Materials
To embark on your hammered art journey, you’ll need a few key items. Fortunately, many are readily available.
1. Hammers: The Artist’s Wand
- Claw Hammer: Your go-to for general hammering, especially for nail art on wood.
- Ball-Peen Hammer: Ideal for metalwork, with one rounded face for doming and shaping.
- Chasing Hammer: Lighter than a ball-peen, with a flat face and a rounded face, perfect for more delicate metal texturing.
- Tack Hammer: Smaller and lighter, good for precision work with small nails.
- Mallet (Rubber or Wooden): Useful for striking chisels or punches without damaging them, and for softer materials.
2. Surfaces and Materials: Your Canvas
- Sheet Metal: Copper, brass, aluminum, and tin are popular choices. Consider thickness – thinner metal is easier to hammer but can be more delicate.
- Wood: Plywood, MDF, reclaimed wood planks, or even thick branches.
- Nails/Brads: Various sizes for wood projects.
- Wire/String/Yarn: For string art designs.
- Protective Backing: A sturdy workbench, a leather pad, or a dense piece of wood to hammer onto.
- Chisels and Punches: For more defined marks and patterns (optional, but highly recommended for metalwork).
- Sandpaper: For smoothing edges and surfaces.
- Finishing Supplies: Metal polish, sealants, paints, wood stains.
3. Safety Gear: Your Shield
- Safety Glasses: Absolutely non-negotiable. Metal shards or wood splinters can fly.
- Gloves: Protect your hands from sharp edges and blisters.
- Ear Protection: Prolonged hammering can be loud.
- Apron: To protect your clothing.
DIY Hammered Wall Art Project Ideas
Ready to get your hands dirty (or metallic)? Here are a few project ideas to spark your imagination.
1. Geometric Nail Art on Wood
This is a fantastic beginner project that yields impressive results.
Steps:
- Choose a wooden board. Sand it smooth if necessary.
- Draw your geometric pattern onto the wood using a pencil.
- Hammer nails or brads along the lines of your design. Ensure they are hammered in straight and to a consistent depth. Leave about half an inch of the nail head exposed.
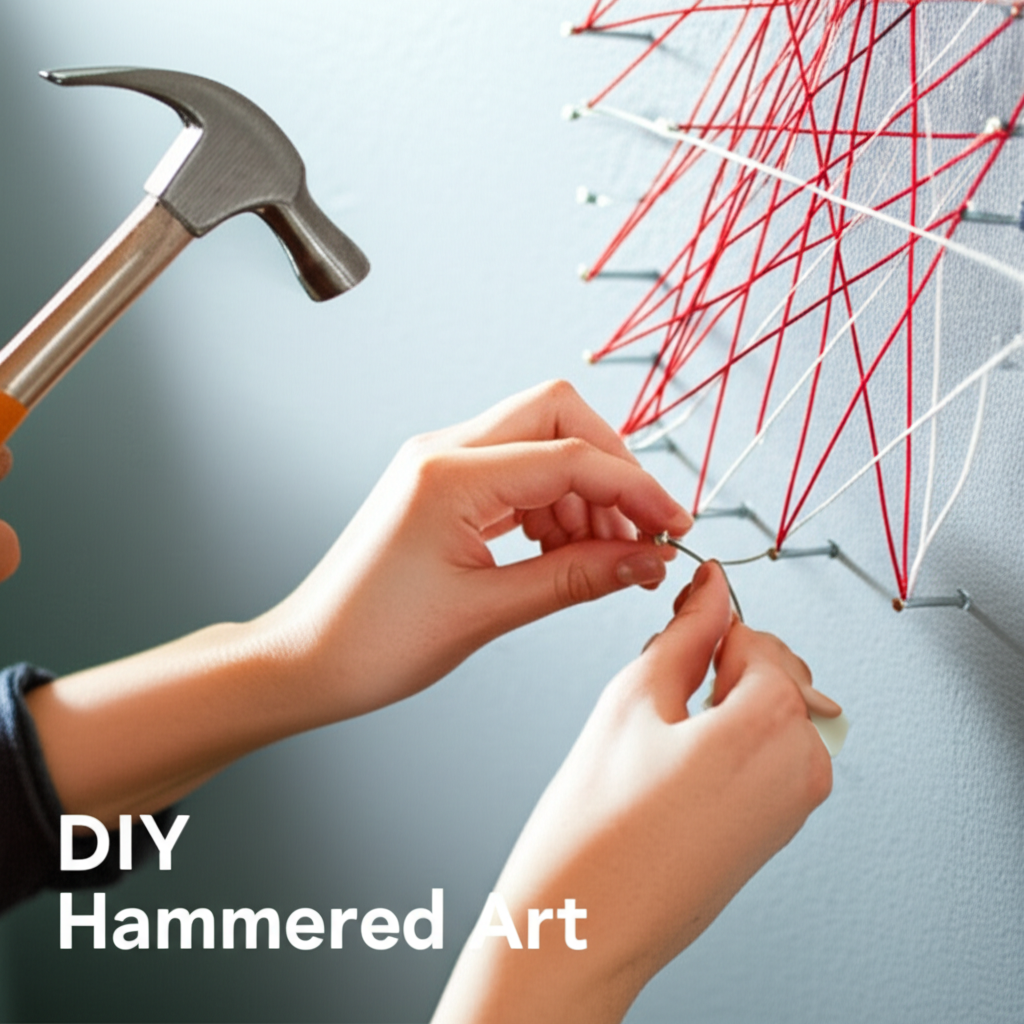
- Tie off your starting string/yarn to one nail.
- Begin wrapping the string or yarn around the nails, following your pattern. Experiment with different colors and thicknesses of string.
- Continue wrapping until your design is complete. Secure the end of the string by tying it off to a nail or using a dab of glue.
- (Optional) Paint or stain the wooden board before starting the string art.
2. Hammered Metal Abstract Texture Piece
This project focuses on the tactile beauty of hammered metal.
Steps:
- Select a sheet of metal (e.g., copper or aluminum). Cut it to your desired size and shape.
- Place the metal on a firm, forgiving surface like a leather pad or a thick piece of wood.
- Using a ball-peen or chasing hammer, begin creating patterns by striking the metal. Experiment with different hammer faces, angles, and pressures.
- Overlap your hammer marks to create depth and flow.
- You can use specialized punches to create circular or star-like impressions.
- Once you’re happy with the texture, use fine-grit sandpaper to gently smooth any sharp edges.
- (Optional) Use metal polish to bring out the shine or apply a patina for an aged look.
3. Hammered Copper Leaf Wall Hanging
A delicate and elegant project that showcases the malleability of copper.
Steps:
- Obtain a thin sheet of copper. You can find copper flashing at hardware stores.
- Print or draw a leaf outline onto paper. Cut it out.
- Transfer the leaf outline onto the copper sheet using carbon paper or by tracing firmly with a blunt stylus.
- Carefully cut out the copper leaf shape using metal shears or a jeweler’s saw.
- Place the copper leaf on a soft surface (like a leather pad).
- Using a chasing hammer and various small punches (dot punches, lining punches), carefully hammer the veins and texture of the leaf from the front.
- For a slight embossed effect (repoussé), you can flip the copper over and gently tap the areas that will be raised on the front.
- Smooth any rough edges with fine-grit sandpaper or a jeweler’s file.
- Drill a small hole at the top of the leaf to hang it.
- (Optional) Use a heat gun and chemical patinas to create beautiful color variations on the copper.
Key Facts and Comparison of Hammering Techniques
Understanding the nuances of different hammering applications is crucial for achieving the desired artistic outcome.
| Technique | Primary Material | Hammer Type | Effect | Skill Level |
|---|---|---|---|---|
| Nail Art (String Art Base) | Wood | Claw Hammer, Tack Hammer | Creates points for string/yarn to wrap around, forming patterns. | Beginner |
| Dishing/Doming | Metal | Ball-Peen Hammer, Chasing Hammer | Creates rounded, convex shapes, adding dimension and depth. | Intermediate |
| Planishing | Metal | Flat-faced Hammer (e.g., Planishing Hammer, Ball-Peen) | Smooths out hammered textures, creates a refined surface. | Intermediate |
| Repoussé | Metal | Chasing Hammer, various punches | Creates raised relief patterns by hammering from the reverse side. | Advanced |
| Simple Texturing | Wood, Metal | Claw Hammer, Ball-Peen Hammer (various parts of head) | Creates random or intentional dents, lines, and impressions for visual interest. | Beginner to Intermediate |
Tips for Success and Troubleshooting
Even with the best intentions, you might encounter a few bumps along the way. Here are some tips to help you create beautiful hammered art.
1. Start Simple
Don’t jump into complex repoussé on your first try. Begin with projects like nail art on wood or simple texture hammering on metal. Build your confidence and skill gradually.
2. Practice Makes Perfect
Dedicate some time to simply practicing your hammering techniques on scrap materials before committing to your main artwork. Get a feel for the force, the angles, and how different hammers interact with the material.
3. Control Your Force
It’s better to start with lighter taps and gradually increase pressure than to hit too hard and ruin your piece. You can always add more marks, but you can’t easily remove them.
4. Work on a Stable Surface
A wobbly surface will make your hammering erratic. Ensure your workbench or hammering surface is stable and won’t move.
5. Embrace Imperfection
Handmade art is about character. Don’t strive for machine-like perfection. The slight irregularities are what give your piece its unique charm.
6. Consider Ventilation
If you’re working with metal finishes, patinas, or potentially scorching wood, ensure you have good ventilation.
Pros and Cons of DIY Hammered Wall Art
Like any creative endeavor, hammered art has its advantages and disadvantages.
| Pros | Cons |
|---|---|
| Highly personalized and unique creations. | Requires patience and practice to master techniques. |
| Cost-effective, especially when using recycled materials. | Can be physically demanding; requires some strength and stamina. |
| Creates tactile and visually interesting textures. | Risk of injury if safety precautions are not followed (flying debris, sharp edges). |
| Therapeutic and rewarding creative outlet. | Some techniques (like repoussé) require specialized tools and more advanced skills. |
| Durable and long-lasting artwork. | Mistakes can be difficult or impossible to correct without starting over. |
| Can be adapted to various styles and aesthetics. | Requires a dedicated workspace where noise might be a factor. |
Finishing and Displaying Your Hammered Masterpiece
Once your hammered art is complete, the final touches can elevate its appearance and ensure its longevity.
1. Cleaning and Polishing
For metal art, use appropriate metal polish to remove any oils or tarnish. For wood, a light sanding can smooth rough areas, followed by your chosen stain or sealant.
2. Sealing and Protection
Metal pieces can be sealed with a clear acrylic spray or wax to prevent further tarnishing and protect the surface. Wooden pieces can be varnished or sealed to protect the finish and the underlying wood.
3. Mounting and Hanging
Consider how you will hang your artwork. For metal pieces, you might drill small holes and use wire or chain. For wood pieces, sawtooth hangers or D-rings are common. Ensure your mounting hardware is strong enough to support the weight of your art.
4. Displaying Your Art
Hang your hammered wall art in a prominent place where it can be admired. Consider the lighting – textured art often looks best with lighting that casts subtle shadows, highlighting the dimension you’ve created.
Conclusion: Hammer Your Way to a More Creative Home
The hammer, often seen as a tool of construction, is revealed here as a surprisingly versatile instrument for artistic expression. Whether you’re drawn to the rustic charm of hammered wood or the metallic sheen of textured metal, DIY hammered wall art offers a rewarding and accessible way to infuse your living space with personality and handmade beauty. So, pick up that hammer, embrace the rhythm, and start creating your own unique statement pieces. The satisfaction of transforming raw materials into art with your own hands is an experience unlike any other.