The humble hammer. It’s often the first tool that comes to mind when you think about DIY and home repairs. While it’s a versatile instrument capable of much more than just driving nails, many people underestimate its potential for furniture repair. From tightening loose joints to reattaching decorative elements, a hammer, when used correctly, can be your secret weapon in keeping your beloved furniture pieces functional and beautiful.
Must-Have Tools in Your House If You Work Regularly


This article will delve into the practical applications of using a hammer for furniture repair. We’ll explore common issues, the specific techniques involved, and what you need to know to avoid causing more damage than you fix. Get ready to rediscover the power of this classic tool!
The Versatile Role of a Hammer in Furniture Repair
A hammer is far more than just a nail-driving machine. Its weight, balance, and the striking surface can be utilized for a surprising range of furniture repair tasks. When approached with care and the right technique, a hammer can:
- Secure loose components.
- Gently tap components into place.
- Aid in dismantling damaged sections.
- Assist in the removal of old fasteners.
- Even be used with specialized attachments for certain repairs.
The key lies in understanding the type of hammer and the force to apply for each specific job.
Understanding Different Hammer Types for Furniture
Not all hammers are created equal, and using the wrong one can be detrimental to your furniture. For most furniture repair tasks, you’ll want to gravitate towards hammers that offer control and a less aggressive strike.
Claw Hammer
The ubiquitous claw hammer is a staple in most toolboxes. While its primary function is driving and removing nails, the claw can be surprisingly useful for furniture. It’s excellent for prying loose panels or gently dislodging stubborn dowels. However, the heavy head and the potential for leverage mean it requires a delicate touch to avoid splintering wood.
Ball-Peen Hammer
Though typically associated with metalworking, a small ball-peen hammer can be useful for furniture. The rounded end (the “peen”) can be used to gently reshape slightly bent metal hardware or to create a small starting indentation for drilling.
Mallet (Rubber, Wood, or Plastic)
These are perhaps the most crucial hammers for delicate furniture work. Unlike metal hammers, mallets distribute force over a larger surface area and are designed to strike without marring or damaging the material. They are ideal for tapping joints together, seating dowels, or nudging parts into alignment.
Tack Hammer
Specifically designed for driving small tacks and brads, a tack hammer is lightweight and has a magnetized head, making it easier to hold and start small fasteners. This is perfect for reattaching fabric, upholstery, or thin decorative moldings.
Key Facts About Hammer-Assisted Furniture Repair
Here’s a quick reference to help you understand the nuances of using a hammer for furniture:
| Attribute | Description/Consideration |
|---|---|
| Primary Function | Driving fasteners, assembling joints, gentle persuasion of parts. |
| Material Sensitivity | Wood, veneer, laminate, upholstery, metal hardware. Requires careful selection of hammer type and force. |
| Damage Potential | High risk of denting, scratching, splintering, or breaking delicate components if used incorrectly. |
| Skill Level | Basic to intermediate. Requires practice and an understanding of the materials. |
| Essential Accessories | Wood blocks, rags, dowel rods, specialized nails/screws. |
Common Furniture Problems Solvable with a Hammer
Many everyday furniture issues can be addressed with the judicious use of a hammer. Let’s explore some of the most frequent culprits:
Loose Joints and Wobbling Furniture
One of the most common furniture ailments is a wobbly leg or a loose joint. This often occurs due to dried-out glue, shrunken wood, or general wear and tear.
Tightening with Dowels and Glue
If a joint is loose because the dowel has shifted or the glue has failed, a hammer can help reseat the components.
- Assess the Joint: Carefully examine the loose joint to identify the method of connection (dowels, mortise and tenon, screws).
- Apply Wood Glue: If the original glue has failed, clean out as much of the old glue as possible from the joint and apply fresh wood glue.
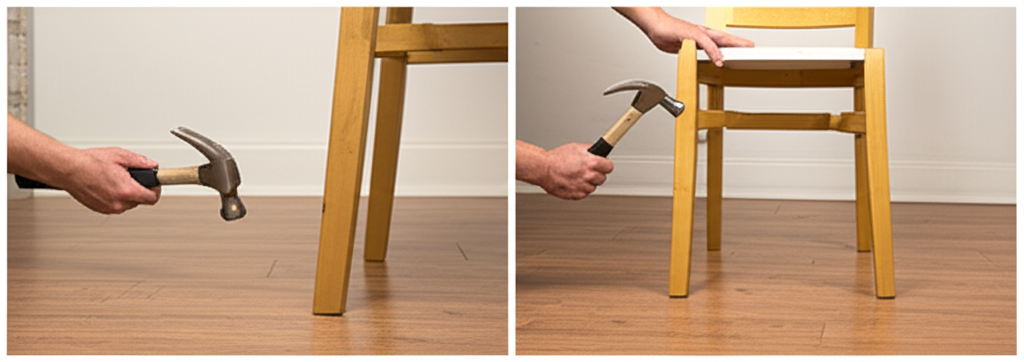
- Reseat Components: Use a rubber mallet and a scrap piece of wood (to protect the furniture surface) to gently tap the pieces back into place. Apply even pressure.
- Tap Dowels: If dowels are loose within their holes, you can sometimes drive them further in with a light tap from a mallet on a scrap piece of wood placed over the dowel.
- Clamp and Cure: Once the pieces are firmly seated, clamp the joint securely and allow the glue to cure according to the manufacturer’s instructions. The hammer’s role here is to ensure a tight, flush fit before clamping.
Securing Loose Tenons
For mortise and tenon joints, if the tenon has loosened within the mortise, a gentle tap with a mallet on the end of the tenon (again, using a protective block) can help seat it more firmly. If there are pre-drilled holes for pins, you might use a hammer to drive the pins in.
Reattaching Loose Veneer or Moldings
Veneer, the thin layer of decorative wood applied to furniture surfaces, can lift or peel over time. Similarly, decorative moldings can come loose.
Using a Tack Hammer for Small Fasteners
For delicate moldings or areas where small nails or brads were originally used:
- Clean the Area: Ensure the veneer or molding is clean and free of debris.
- Apply Adhesive: Apply a suitable wood glue or veneer adhesive under the lifted section.
- Press and Secure: Gently press the veneer or molding back into place.
- Use a Tack Hammer: If small nails or brads are needed to hold it while the glue dries, a tack hammer is ideal. Place the nail precisely and give it a few light, controlled taps to drive it in without damaging the veneer or wood.
- Consider a Blocking Technique: For more significant lifting, you might place a small, clean wood block over the area and tap it lightly with a rubber mallet to seat the veneer. This distributes the pressure.
Dealing with Loose Upholstery Tacks
The fabric on upholstered furniture is often held in place by small decorative tacks or staples. These can loosen over time.
Gentle Tapping with a Tack Hammer
A tack hammer is perfect for this task:
- Identify Loose Tacks: Locate the tacks that have popped out or are no longer holding the fabric securely.
- Align Fabric: Gently pull the upholstery fabric taut to its original position.
- Reposition Tacks: If a tack is loose but still in place, you can often gently tap it back in with the face of a tack hammer.
- Drive New Tacks: If a tack has come out completely, use the magnetized head of the tack hammer to position a new tack and drive it in with controlled taps.
- Work Systematically: Reattach the fabric in sections, ensuring it remains smooth and wrinkle-free.
Removing Stubborn Old Fasteners
Sometimes, you need to remove old nails or screws to make a repair. While screwdrivers are primary for screws, a hammer can be crucial for nails.
Using the Claw of a Hammer
For nails:
- Protect the Surface: Place a thin piece of wood or a sturdy cardstock (like an old credit card) under the claw of the hammer where it will contact the furniture. This prevents the hammer from digging into the wood.
- Leverage Carefully: Slide the claw under the nail head.
- Gently Pry: With the protective material in place, gently rock the hammer back to lever the nail out. Avoid yanking, which can damage the surrounding wood.
- Multiple Attempts: If the nail is stubborn, you may need to reposition the hammer or work the nail slightly back and forth.
Assembling Flat-Pack Furniture
While often overlooked in the context of repair, assembling flat-pack furniture relies heavily on hammer techniques.
Securing Cam Locks and Dowels
When assembling furniture kits, a rubber mallet is often your best friend. It’s used to:
- Seat Dowels: Gently tap wooden dowels into their corresponding holes using the mallet and a scrap wood block if needed.
- Align Panels: Lightly tap panels together to ensure they are flush and seated correctly before securing them with cam locks or screws.
- Engage Cam Locks: Some cam lock systems require a gentle tap to fully engage.
The Art of Striking: Techniques for Using a Hammer on Furniture
Mastering hammer techniques is less about brute force and more about precision and control.
Controlled Tapping vs. Forceful Hitting
This is the golden rule: less is often more.
- Tapping: A series of light, controlled strikes. Use your wrist for a flicking motion, not your whole arm. This is for delicate work like seating dowels, driving small nails, or nudging parts.
- Hitting: More forceful strikes, typically using your elbow and shoulder. This is for driving larger nails into structural wood, not for delicate furniture surfaces.
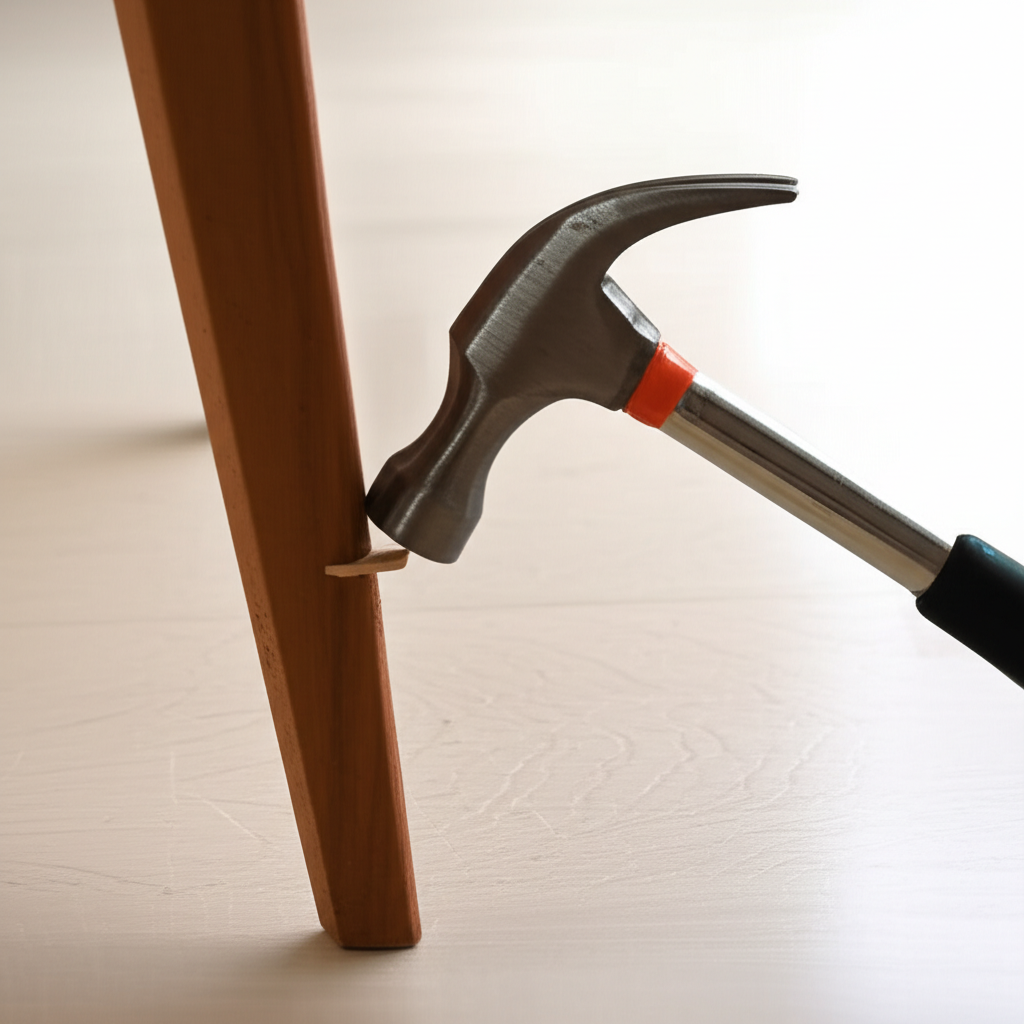
Using Protective Blocks
Always use a block of scrap wood, a piece of thick cardboard, or even a folded rag between the hammer and the furniture surface whenever you are striking directly. This prevents dents, scratches, and splintering.
Proper Grip and Stance
Hold the hammer towards the end of the handle for maximum leverage and power. For lighter tasks requiring more control, gripping closer to the head can be beneficial. Stand with your feet shoulder-width apart for stability.
Practice Makes Perfect
If you’re new to furniture repair with a hammer, practice on scrap wood first. Get a feel for the weight of the hammer and how much force is needed for different materials and tasks.
When NOT to Use a Hammer for Furniture Repair
While versatile, a hammer is not a universal solution. There are many situations where using a hammer would be a mistake.
Delicate Finishes and Veneers
Directly hammering on a fine veneer or a highly polished finish is almost guaranteed to cause damage. If a part is stuck, forcing it with a hammer is rarely the answer.
Loose Screws
A hammer is entirely inappropriate for driving or removing screws. You need a screwdriver or a drill/driver.
Structural Integrity of Certain Joints
While a hammer can help seat parts, it cannot replace proper joinery techniques or the need for strong, well-fitted connections. If a joint is fundamentally compromised, a hammer alone won’t fix it.
Anything Requiring Precision Alignment (Without Protection)
If you need to precisely align a delicate piece, a hammer might knock it out of alignment if not used with extreme care and protective blocks.
Hammer-Assisted Furniture Repair: Step-by-Step Comparison
Let’s put it all together with a comparison of common scenarios.
Scenario 1: Reattaching a Loose Molding Strip
| Step | Hammer Tool | Technique | Protection Needed | Outcome if Done Incorrectly |
| :———————————— | :————- | :———————————————————————– | :—————- | :————————————————————- |
| 1. Clean and position the molding | N/A | Ensure surface is clean. | N/A | Molding won’t adhere properly. |
| 2. Apply wood glue | N/A | Apply sparingly under the molding. | N/A | Weak bond or excess glue squeeze-out. |
| 3. Hold molding in place | N/A | Press firmly to seat. | N/A | Molding shifts before glue sets. |
| 4. Secure with small brads/nails | Tack Hammer | Place brad on edge of molding. Light, controlled taps. | Yes (under head) | Damaged molding, dented wood, bent brad. |
| 5. Wipe away excess glue (if any) | Damp Cloth | Gently remove excess. | N/A | Glue residue dries and is harder to remove. |
| 6. Allow glue to cure (clamp if needed) | Clamp (optional) | Apply even pressure. | N/A | Weak bond if not clamped properly. |
Scenario 2: Tightening a Loose Chair Leg (Dowel Joint)
| Step | Hammer Tool | Technique | Protection Needed | Outcome if Done Incorrectly |
| :————————————– | :————- | :——————————————————————————— | :—————- | :——————————————————————- |
| 1. Disassemble if possible (carefully) | Claw Hammer | Gently pry apart if glued. | Yes (under claw) | Splintered wood, damaged joint. |
| 2. Clean old glue from joint and dowel | Scraper/Cloth | Remove all residue. | N/A | New glue won’t adhere well. |
| 3. Apply fresh wood glue | Glue Bottle | Apply to both dowel and inside the leg hole. | N/A | Insufficient glue leads to a weak joint. |
| 4. Reseat dowel into leg | Rubber Mallet | Place a scrap wood block on dowel end. Light, firm taps to seat firmly. | Yes (wood block) | Damaged dowel, split wood, incomplete seating. |
| 5. Reassemble leg to chair frame | Rubber Mallet | Align parts. Use scrap wood block on joint. Gentle, even taps to close gap fully. | Yes (wood block) | Misaligned parts, chipped edges, damaged joinery. |
| 6. Clamp securely and allow to cure | Clamp | Ensure firm, even pressure. | N/A | Loose joint if not clamped or allowed to cure properly. |
Pros and Cons of Using a Hammer in Furniture Repair
As with any tool, there are advantages and disadvantages to consider.
| Pros | Cons |
|---|---|
| Versatility: Can perform multiple tasks from securing to minor dismantling. | High Risk of Damage: Easy to dent, scratch, or splinter furniture if not used with care. |
| Cost-Effective: Hammers are relatively inexpensive and readily available. | Requires Skill: Improper technique can lead to more damage than the initial problem. |
| Accessibility: A common tool found in most households. | Not for All Materials: Unsuitable for very soft or delicate finishes without extreme caution. |
| Effective for Small Fasteners: Ideal for tacks, brads, and seating dowels. | Limited Precision: Can be difficult to achieve fine, precise alignment in some cases. |
| Can Aid Assembly: Essential for assembling flat-pack furniture. | Can Loosen Other Parts: Forceful hammering can sometimes vibrate and loosen adjacent components. |
Conclusion: Your Hammer, Your Furniture’s Friend (When Used Wisely)
The hammer is a fundamental tool for any DIY enthusiast, and its application in furniture repair is significant. By understanding the different types of hammers, mastering controlled striking techniques, and always prioritizing the protection of your furniture’s surfaces, you can effectively tackle a range of common issues.
Remember, patience and a gentle touch are key. When in doubt, always opt for a lighter hammer, use protective materials, and start with less force. With practice, your hammer can become an indispensable ally in keeping your furniture in top condition for years to come.